If you’re a regular Excel user, you probably know that grouping worksheets can be a real time-saver. Whether you’re organizing data, creating reports, or analyzing information, grouping worksheets can help streamline your workflow.
But if you’re not sure how to group worksheets in Excel, don’t worry – it’s easier than you think! In this article, we’ll show you a simple step-by-step guide to help you get started.

how to group worksheets excel
How to Group Worksheets in Excel
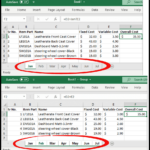
First, open your Excel workbook and select the worksheets you want to group together. To do this, hold down the Ctrl key on your keyboard and click on each worksheet tab that you want to include in the group.
Next, right-click on one of the selected worksheet tabs and choose “Group Worksheets” from the menu that appears. This will create a new group tab at the bottom of your workbook, where you can see all the grouped worksheets together.
You can now make changes to all the grouped worksheets at once, such as formatting cells, entering data, or creating formulas. Any changes you make will be applied to all the worksheets in the group, saving you time and effort.
When you’re finished working with the grouped worksheets, simply right-click on the group tab and choose “Ungroup Worksheets” to remove the grouping. Your worksheets will return to their original state, but you can always group them again if needed.
So there you have it – a quick and easy way to group worksheets in Excel. Give it a try next time you’re working on a project, and see how much time you can save with this handy feature!

How To Group And Ungroup Worksheets In Microsoft Excel

How To Group And Ungroup Worksheets In Excel YouTube

How To Group Sheets In Excel

How To Group Sheets In Excel

How To Group And Ungroup Worksheets Sheets In Excel